Category: Knowledge Center

Select the soft tail mountain bike

Select the soft tail mountain bike

How to pick soft tail mountain bikes

Some people think soft tail mountain bikes are not good enough for mountaineering. The reason why they think so is probably that they haven’t carefully chosen a soft tail frame with a travel below 4”,which is used for mountaineering and climbing. Even though it is VPP from Intense Group, the pedaling of the bike frame with big travel doesn’t mean the pedaling for climbing. The pedaling performance of a bike frame with big travel is put forward based on acceleration. For example, after you pass a curve, you should accelerate right away. Whether the bike is suitable for climbing is not only the problem of ‘strength releasing’, the angle of the complete bike and the weight will probably affect the force exerting when you cycle uphill.

The important role of the soft tail bike frame is to withstand the jolt and take advantage of suspension to offset the irregular leap of wheels which is caused by the bumpy ground. Make tires touch the ground tightly all the time so that you can drive or brake. At the same time, the good stability of the bike will be easy for cyclists to pedal and handle. Only the bikes are stable enough, you dare to cycle faster or you can cycle faster- whatever you cycle uphill or downhill. The purpose of soft tail bike frames is to make you stable and provide a control platform for you to pedal. The bumpier the complicated roads are, the more soft tail bikes are required. This point is applicable to not only large travel, but also small travel.

How to choose a soft tail bike frame and confirm the travel you need is closely related to your demands for mountain bikes. How is the bumpy extent of the road you cycle? How much speed do you want to reach? These factors will decide the size of your travel rather than the gradient will. The bike can also go down slowly if you pinch the brakes of hard tail XC on DH roads. You can hump the bike if there is a drop in some places. So whether you need the hard tail depends on the speed you want to reach rather than the gradient. The bumpier the road is and the faster you want to be, the larger the travel you need is. If the mountain road is natural enough, it is bumpy all the time. There is no absolutely smooth mountain road.

There is no absolute hard tail about the concept of mountain bike. Even the tire can provide the effect of 100-mm hard tail, let alone the carbon frame, which is publicized as a soft tail with 1” travel.  The reason why hard tail is expensive is its “softness”, which means it has excellent performance of triangular longitudinal deformation and can withstand the jolt. Although the bike frame with small travel is not good at withstanding the jolt, its weight is light and its angle is suitable to pedal, so it is suitable for climbing. With the increase of the travel, the bike frame’s ability to withstand the jolt will strengthen, but the weight of the bike frame will definitely increase and the angle should take the handling rather than pedaling into consideration. So it will be more and more suitable to accelerate with the help of earth gravity when you cycle downhill.

Then how to choose it? If the bike frame with the travel below 4”is equipped with the 80-100mm front fork, the weight of the complete bike will be easily below 10.5 kg, and its pedaling feeling will not be worse than the pedaling feeling of hard tail in terms of angle and rigidity. At the same time, the strength of driving and gripping the ground will be stronger. We suggest that people who like cycling uphill at an amazing speed should choose 4”and below. These kinds of bike frames are also very common at world championships, and what we mentioned above is just the conditions of soft tail whose size is below 4”. If the bike frame with the travel below 4.5”, 5 ”or 5.5” is equipped with the110-140mm front fork, the weight of the complete bike will easily reach 12.5 kg or within 12.5kg. It achieves more perfect resistance ability at the same time of sacrificing some ‘assault’ properties when cycling uphill. You can continue to exert your strength when you are pedaling.

…is the main type that my peers will use for “mountain”.  We suggest that people who are not eager for the cross-country race and mainly play rally and like crossing all kinds of places can choose this kind of bike, which is called ‘being able to work at both higher and lower level without any complaint’. If the bike frame with the travel of 6” or about 6.5” is equipped with the 140-160mm front fork, the weight of the complete bike is basically 13 kg to 14 kg. Now you can feel tired when pedaling and the uphill speed begins to be greatly affected, but it still has the perfect passing properties and begins to support technical leap. It begins to show the properties of going downhill at an amazing speed, going uphill and downhill without any complaint when crushing.  Cyclists begin to get rid of trembling with fear when facing a drop and they can deal with hairpin curves and curved walls with ease. People who pursue the feeling of flying, jumping and ‘handling’ can choose the bike frame with this kind of travel.

If the bike frame with the travel of 7”or 8.5” or 8.5”and over is equipped with front fork of 180mm, 200mm and over, please forget about climbing and just go seek the telpher. If you want to cycle uphill, you just need to pedal your bike in a casual way. There is no need for me to mention the weight of the complete bike because everybody knows about it. People who like pursuing excitement between falling on the ground and not falling on the ground and showing the attitude of ignoring the drop and big stones can choose this kind of bike frames. If you choose this kind of bike, don’t try to have a climbing race against people who have hard tail bikes. And they don’t like to have a race of cycling downhill against this kind of people as well.

How to practice continuous climbing ability

How to practice continuous climbing ability

The skill and technology

You should save the physical endurance as more as possible at the beginning when having a race on the rolling hill belt or the area which only has a 5 to 10 minutes’ ascent. Amateur cyclists usually can’t decide between how to keep in step with the whole group at the beginning and saving the physical endurance for the following ascent.

One of the ways to ease fatigue is to think about how you produce the physical endurance that you need when cycling uphill. You may feel very good after standing up, using the chain wheel, dashing up to the top of the slope at the very beginning of riding a bike. In fact, you have used a large amount of muscle fiber energy while most of them are fast muscles which will make you feel tired. These fast muscles should be used when you need them to provide great acceleration so you should mainly rely on slow muscles to provide energy at ordinary times. If you want to do like that, you should sit to ride a bike when beginning to cycle uphill and adjust to a more relaxing gear ratio at the same time of improving your cadence. Now your output power is the same as the output power produced when you sit to cycle or even higher.

It is really a good method to stand to cycle at several-minute intervals because you can stretch your back by doing so and your legs can have a rest by changing the way of pedaling and then you can sit to cycle again.  You should make the most of the addition power provided by weight when standing to cycle. Your weight is mainly supported by the saddle when sitting to cycle. However, you can take advantage of your weight to strength the pedaling intensity when standing to cycle, which is like that putting a booster on your legs. But if you still keep the gear ratio of which you sit to cycle, you will not get any additional benefit so you should raise 1 or 2 gear ratio correspondingly. Your cadence will decrease when standing to cycle so you should adjust to a higher chain wheel and take advantage of your weight to keep or even improve your output power and speed.

Climbing speed

To those cyclists who need to improve the power to cope with continuous climbing, one training mode that I recommend the most is the climbing speed. The point of this kind of training mode is to keep suitable and sustainable speed at the bottom of the slope and pick up speed when approaching the top of the slope.

Professional cyclists will train on the slope whose length can reach up to 10 minutes or in bigger places. But to most amateur cyclists who is preparing for climbing races,the distance should be shorter. For example, they can practice on an (a series of ) ascent whose length is 2-4 minutes, begin to cycle uphill at moderate speed and then raise the speed to a changeable but sustainable way gradually, keep the cadence at 80-90 each hour (70% or 80% of the power. If you are familiar with CTS on-site test, it should be 86 -90% of the on-sit power and 92-94% of the on-site testing heart rate or lower than your lactate threshold.)

Keeping the output level until you are 30-45 seconds away from the top of the slope and then you can begin to pick up speed. First you should raise the cadence and then raise the gear ratio. At last you should pick up speed all the way until you reach the top of the slope. When you arrive on the top of the slope, you should use 90% of your effort and at least 90% of the on-site testing power and 95%-97% of the on-site testing heart rate or above. You should have a rest every 3 or 5 minutes. High level cyclists can reduce the rest time to 1-2 minutes. Green hands or cyclists at a medium level should set their goals of training in climbing acceleration 8 times while high level cyclists should practice 10 times.

Training in climbing acceleration helps to cope with changes of riding rhythm, especially when you are on continuous slopes. But sometimes you can take advantage of this ability to launch a sprint for the destination or get rid of the big group.

Cycle uphill to hit the mountain

Training in cycling uphill to hit the mountain can not only make up for some ability to cycle uphill (such as the oxygen consumption when launching an attack, the lactate threshold when getting rid of other cyclists, etc.) but also make athletes practice how to win in a sprint finish during the training. Firstly, you should understand your own gap and shortcomings. But when you are making efforts to make up for the gap, a large amount of lactic acid will be produced so you must have the ability to remain to keep a higher speed when the body is processing the lactic acid. These trainings will be helpful to improve this kind of ability.

Look for a hill which you can cycle on for at least 4 minutes. If no slope is available nearby, you can practice on flat ground. This practice will greatly help athletes to launch an attack and get rid of others when they are on flat ground. You should be at higher speed at the beginning of cycling uphill and then stand up to pick up speed by shaking bikes as hard as possible. The process of shaking bikes is no less than 45 seconds. You should keep a training speed that you can keep with the highest strength until the end of the climbing after you begin to pick up speed (If you practice on the flat ground or a long slope, you should keep this status for 4 minutes.).

The output power in this part of training should reach or even exceed the level when you cycle uphill with great efforts and the cadence should be more than 80 times every minute. The climbing output power should reach up to 95%-100% of the on-site testing power. If you use heart rate as a standard, then it should be 95%-97% of the on-sit testing heart rate level. You can cycle for 5 minutes easily at training intervals to make a recovery. Green hands should finish 4 sets of trainings while medium and high level cyclists should finish 6 sets of trainings.

Methods, maintenance and precautions of mountain bikes

Methods, maintenance and precautions of mountain bikes


The quick release is a kind of fastener which is specific to bikes. The handle of the quick release is just the secret of the quick release. The shaft of the handle penetrates the hole on the head of the quick release level.  The shaft can swing relative to the quick release level. There forms a cam at the end of the handle, working in coordination along with the handle seat.
The cam will push the handle seat if you move the handle from an open position to a closed position—then the distance between the handle seat and the nut which is at another end of the quick release level will be reduced and the quick release will be tighten. In addition, there is another kind of quick release whose cam is wrapped in the quick release clamp so you can’t see it.
The operational principle of this kind of quick release is totally the same as what we introduced above.
The quick release used for the axle has two little springs. These two little springs can make the two ends and the head of the axle have basically equal distance after the quick release is open, which will make you easier to install the wheels on the frame—two spaces are corresponding to two axle hooks so the axle can be put into the opening of the hook directly and the quick release will not be a hindrance. The quick release on the seat post clamp don’t need these two springs.

The history of the quick release
The quick release, invented by an Italian named Tullio Campagnolo in 1930, is an ingenious component which is very suitable for bikes.
He took part in an amateur bike racing in the winter of 1927.  At that time each side of the rear wheel of the bike had one freewheel and these two freewheels differed in size.
Using the big freewheel would save effort when you cycled uphill. And you could be faster if using the small freewheel to cycle downhill or on the flat ground. If you wanted to change the freewheel, you had to take off the rear wheel, turn it over and install it on the bike again. At that time we used the wing screw to install the axle and we could tighten it by hands directly.
But the snow froze the screw in winter and Campagnolo’ hands were frozen so he couldn’t tighten the screw. Then he began to think hard about some methods to improve it. Three years later, he invented the popular quick release. In 1933, he invented the derailleur once more which lays the groundwork for the modern bikes with derailleur. From then on, a famous bike component brand called Campagnolo appears. The quick release also exists in their trademark as Campagnolo’s fist invention—the handle of the quick release and the flying wings.

The instructions of the quick release
The quick release plays a role in fastening key components of the bike–wheels and the seat post. If you can’t use the quick release rightly, you can’t make sure that the wheels and the seat post have been well tightened, which will cause a serious accident. So we must tighten the quick release rightly and conform to some precautions to ensure it can be used safely.

The first thing I need to note is that don’t ever regard the handle of the quick release as the cranking bar and use it to rotate the quick release level when you are tightening the quick release! This kind of operation is totally wrong by which you can’t get enough fastening force—little power will be produced when the quick release level is rotated into the quick release nut.
The main reason is that the handle of the quick release is too short to produce the torsion. (Think about the wretch which is used to tighten the axle nut. Its moment arm of force is at least a dozen centimeters in length.) In addition, the size of the nut and screw is too small to have good ability to tighten. Unfortunately, every one has the common sense to use the nut and the screw to tighten components. There have nuts and screws on the quick release and also has a small handle on the screw.
Those who don’t know the quick release well will naturally think of “shaking”, which makes this seriously wrong operation mode happen easily. So we want to emphasize here that make sure don’t do it like that!

We should also note that the wrong operation mode of “shaking” will damage the quick release, the frame and the front fork as well. The chances are that the excessive spinning force will cause serious damage to the screw thread of the nut and the screw because the reason why the screw thread is designed here is to bear the load and it is not endowed with the ability to withstand the abrasion and occlusion when being rotated by strong power. Friction among the quick release clamp, the bike frame and the front fork will form scratches.

In fact, the quick release has its own tightening structure—namely the cam, which has been mentioned above. When tightening the quick release, you should adjust its tightness first. The adjustment method is as follows: rotate the nut of the quick release, and tighten it slowly at the time of pulling the handle of the quick release to test its tightness, making the handle of the quick release begin to experience resistance when the handle of the quick release and the quick release are in a line—it means that if you want to continue to close the handle of the quick release, you should exert more strength from this angle. This kind of adjustment method aims to exert the strength easily. After finishing adjustment, you can move the handle of the quick release hard to get it tightened. You should move it through at least 90 degrees. At the same time, you can feel that you have exerted so much strength (You have to use the palms to move it) and feel the “resilience” which is produced when the quick release are lengthened (In fact, the quick release obtains the fastening force by lengthening the quick release slightly. As long as the quick release has good lubrication you can feel this kind of force. ). If you feel the force is weak when tightening, there maybe have two reasons: one reason is that the cam of the quick release shows signs of serious wear, which can not lengthen the quick release efficiently,so you should change to a new one immediately; another reason lies in the size of the frame.

When the axle is put into the axle fork, there are spaces between the axle fork and the head of the axle. You fail to make the quick release level tight enough because of these spaces when you are tightening the quick release, so you should make it tighter when adjusting the tightness.  When tightening the quick release, you’d better move it more frequently.  You move the handle of the quick release through over 90 degrees just after the handle of the quick release and the quick release level are almost in the line. If you can feel that the resistance of the handle of the quick release has been reduced, it means it just passes through the highest point of the cam and now the quick release is in stable condition. It will not loosen easily and be very reliable.

In order to prevent the handle of the quick release from loosening accidentally because of the strange stuff, the direction of the quick release really matters. Generally,the quick release of the front wheel faces backwards or runs parallel to the front fork while the quick release of the rear wheel faces backwards or runs parallel to the seat stay. The quick release of the seat post clamp usually faces downwards or forward or runs parallel to the stem of the frame.  Some handles of the quick releases of the seat post clamps look like semi-rings, which can be moved forward horizontally and be put into the seat post clamp.

If you want to open the quick release, what you should do is to loosen the handle until it is vertical to the quick release level. At this point, both the quick release seat and the quick release nut will separate themselves from the axle fork, the wheel can be taken off, and the seat post clamp be loosened. The openings of some axle forks have two projections while there is a loop of bulging edge around some axe forks. All these projections can prevent the wheel from falling out of the axle fork when the quick release loosens accidentally so it belongs to a safety design.

With this projection, pulling the handle of the quick release until it is open is far from being enough when you need to install and take off the wheel. Only the quick release nut is loosened, you can install and take off the wheel smoothly. In fact, these projections are not necessary and a lot of frames and front forks haven’t this kind of design. As long as the quick release is installed properly, it is also all right and it can be installed and taken off easily.  You don’t need to screw the quick release nut every time. If you want to check whether the quick release is installed properly, you can lift the bike up and make the wheel suspend from the sky, then punch the wheels downwards. If the wheels are not loose, it means the quick release has been installed properly. The reliable way, however, is to readjust the tightness of the quick release and tighten it properly.

The maintenance of the quick release
The main maintenance of the quick release is its lubrication.  Adding enough lubricating grease on the cam of the quick release can reduce the wear of the cam. And adding a thin layer of lubricating grease on the screw thread of the quick release can prevent rust, corrosion and thread occlusion. Some quick release clamps whose surfaces produce friction with the cams are made of engineering plastic. This kind of quick releases don’t need to lubricate the friction surface between the cam and the quick release clamp, but you’d better lubricate the axle of the cam.

Precautions
1.You must check the quick release for fear that other people have used it and you can’t fasten the wheels and the seat post reliably after parking your bike in public places because the quick release can be operated without any tool and attract people’s attention easily.

2.For bikes with brake discs, you can’t put the handle of the quick release on the side which has a disc brake for fear of touching the disc.

Solution to the oil in the mountain bike

Solution to the oil in the mountain bike

Solutions to oil getting into the disc brake of mountain bikes

It will be very annoying if there has oil in the disc brake system. It will cost you a fortune to change the brake lining and the disc itself. Then I will share some solutions when there has oil in the

disc brake of mountain bikes here:

1.Deal with the brake lining
Bake the lining on the open fire until you can see little smoke rise. Perhaps some small bubbles will form on the baked lining and what you should do is to rub it down with fine sandpaper.

2.Deal with the disc
Take the disc off the hub and buy a bottle of kitchen cleaning agents like Mr. Muscle.  Spray some cleaning agents evenly onto the disc and let it stand for 10 minutes after the disc get wet.  Then use a scouring pad to scour the surface of the disc. At last you should clean it with water. If something on the disc disperses after touching the water, it means that there still has some oil on the surface. So you should clean it repeatedly until the water film can completely cover the brake area of the disc.

Please note that cleaning agents is usually harmful to your hands so you’d better wear the gloves when washing.

The dealt lining and disc can be restored to 80% of its former braking force.

We suggest that people who like rushing to the mountain should check the disc brake system carefully. If an accident happens, the medical expenses are much more expensive than the expenses of changing a disc brake.


To change the brake

To change the brake

carbon wheels rider

Teach you how to improve the braking performance of mountain bikes

To mountain bikes, the most important thing for competitive games is to race the braking skills so whether the performance of a brake is good or not is very important. It will affect not only competitive skills but also security, so you have to check and adjust the brake carefully before going cycling or the race. In order to cope with vigorous races, an editor called Cycler from China Bicycle Network will discuss something about the brakes with everybody.
The control of brakes

A good brake doesn’t mean it can make the tire stop but make the bike stop by reducing rotation in the state of grasping the ground. If the tire is in a state of glide, the braking distance will be longer.

The irreconcilability of the brake means that how the power when cyclists are raising or reducing the brake lever can be transferred to the brake quickly. If the performance of the hydraulic brake is too strong, you will fall off when failing to brake.

In addition, some series will take advantage of the impedance of the spokes and brake shoes to strengthen the braking performance. It is hard to control this kind of series on slippery roads because the impedance of the spokes and brake shoes exceeds the impedance of the road. To this kind of brake, if you release the brake level when the bike starts to glide, the reaction is so slow. It is still suitable for beginners because they usually cycle slowly and brake gently.

Plate-Stabilizer
The power that presses the rims originally will transfer to expanding power after the brake is activated. In order to inhibit this phenomenon,it will be better to install the plate. Once it is installed on the brake, the force which is put on the brake lever will not be wasted and totally transferred to the brake. And it will become the brake with good controlling performance.

The brake shoes
The brake shoe is something to tighten the rim. Its material will greatly affect the brake and the sense of touch. If the compound is soft enough, it is very handy in dry weather. But it will become very bad if it gets wet due to the rain so you should use brake shoes made of different kinds of materials according to the race situation.

The grip
You are required to control the bike body strictly in athletics like Slalom, Downhill and Trial. It is better to use slip-proof and harder rubber instead of soft grips like sponges.

Your hands will hurt on occasions like cross-country events, traveling by bike if you grab the grip for a long time so you should use the grip whose surface is smoother. But you need to use grip with impedance according to the route situation of a cross-country event. It is also good to wrap the soft belt around the grip when no real skills are required.

The brake cable

Longer brake cables will cause some problems like the stretch of the cables, slow reaction and imbalance. If the length of the brake cable is proper enough, you will not feel it too tense when turning the grip to the left and right.

If you want to adjust the angle and the protrusion of the grip, what you should do is to change the handlebar stem. Handlebar stems come in all angles and sizes. If your purpose is to do a race, you can choose the protrusion.

A length of 120-160 mm is better by which you can control the bike more stably at high speed while the angle of 90~120°is better. They must match the frame and the body well no matter they are angles and protruding length, so you should choose them carefully.

Mountain bike bearing and the difference between the ball drums where?

Mountain bike bearing and the difference between the ball drums where?

Mountain bike Pei Lin (bearing) and the difference between the ball drums where?
chosen hub

The difference between the bearing hub and the ball hub of the mountain bike

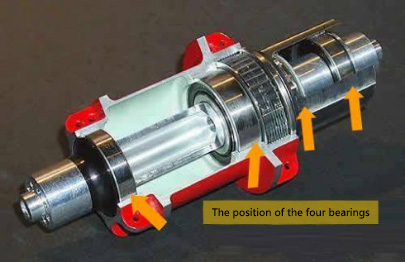
the hub with 4 bearings
Many bike enthusiasts are not familiar with the hub, which is one of the bike accessories. In fact, the hub plays a key role in the performance of the complete bike. Hubs are mainly divided into bearing hubs and ball hubs. Then what’s the difference between the bearing hub and the ball hub of the mountain bike? Now TTGO Bicycles will offer everybody a detailed explanation.
.

The ball hub consists of the cup,axle-crosspiece and closely spaced balls (there is a gap for moving in the middle). The hub body and they constitute a big bearing. The ball bearing of the same size can hold more balls because it is unlike the industrial bearing that needs to use the cage among the balls. And each ball’s contact area is larger and can bear more pressure.
The number of the bearing hub’s balls which are in the middle of the bearing is less than that of the ball hub. And the cage is required to keep the distance of each ball inside the bearing. There are seal rings on both sides as well.

It means that the lubricity of the bearing hub is slightly worse than the ball hub. The cage will perish if it is used for such a long time. Both the uneven distribution of balls and the chips’ falling into the cage will greatly affect the lubricity. However, there are more balls in the ball hub so it will not perish and wear quickly in the same condition. And there won’t be chips due to the lack of the cage.
The bearing of the bearing hub is pressed in so it is hard to dismantle it without specific tools when you are installing and dismantling it. Improper dismantling ways will damage the hub and even make it work improperly so it is not easy to maintain it.

The structure of ball hubs is relatively easier than that of bearing hubs. Usually speaking, only two wrenches and one sleeve can help you finish dismantling them.  It is easy to maintain them.

But ball hubs have a deadly weakness: only two ball structures can be hold in one hub (there will be one on each side). However, bearing hubs can hold two (hubs with two bearings) or four (hubs with four bearings) or even more. Once a new bearing is added, the average pressure of each bearing will be reduced, the press resistance be strengthened, the damage to the axle center be lowered, and the axle center will not bent easily.

Multiple-bearing hubs (which have 2 bearings and above) are usually used in mountain bikes with huge cross-country extent or high longitudinal pressure, such as all-terrain, downhill, cycling down cliffs, etc.

Something you should know before you buy carbon road bike wheels

Something you should know before you buy carbon road bike wheels

Nowadays,there are many different types of riding a bike,and riding a bike on road is one of the most popular ways.   Many people would like to go out riding with others and have a race which are not particularly for professionals. Speed and distance have a great effect on these riders.  The difference between leading the group and riding at the last is very small.

 
1.There are two ways to make your cycling skills much more  better than before. One is to train yourself hard so that you can ride a bicycle for longer periods of time.  The other is to improve your bike which can has a more powerful and efficient performance. You should try to enjoy the race in a freind way.
 
That's why carbon wheels exists. They are lighter and have  better aerodynamics than standard metal wheels. That means riders who ride a bike with carbon wheels will be easy to ride faster than those whose wheels are not made of carbon.
 
If you replace your current wheels with carbon ones, you will become a better and faster cyclist right away. There is no other better way than using a aerodynamic carbon wheels.
 
If you want to upgrade your bike, changing to road bike with carbon wheels will be the most valuable. They are a little expensive,but they will pay off when you compare the prcie with the improvement on the speed.
 
2.The difference between"Clincher Wheels" and " Tubular Wheels"
 
Here is the answer: if you want to take part in a competition, you can choose tubular wheels. If you are looking for  all-around wheels, you can choose clincher wheels. There are more criteria other than the two mentioned,but most people will buy a bike according to that two criteria.
 
Clincher and Tubular mean the type of rim and which type of tire can be used on the wheel.
 
Carbon clincher wheels are the most common type and can be used with a tire and inner tube. If your have a flat clincher wheel, you can change the inner tube and go on cycling quickly.
 
The weight of  carbon tubular wheels are lighter and its price is cheaper, but you have to use specific tubular tires.  Firstly ,you should put the tires and inner tube together to become one piece, and then we will use glue to stick it to the wheel.  In most cases, tubular tires are more expensive than clincher tires. If you are in a flat road, they are not very easy to be changed.
 
If you want to change a tubular tire, you will have to remove the glue from the tire and stick fresh glue to the new tubular tire. It will take some time to wait the glue dry. Many people will not be glad to change it when they are going cycling. The reason why tubular tire is  popular with professional racers is that it is cheaper and lighter but not convenient.
 
Why do some famous corporations only produce tubular carbon wheels? The reason is that nowadays it is very difficult to produce a carbon clincher wheel which can be strong enough in our daily life.This is why some corporations only sell tubular wheels and use aluminum rims to glue onto aerodynamic carbon fairings.
 
at carbonfan We have advanced technology in making clincher wheels. We use  a special type of material on the rims which is called basalt.  Basalt makes the carbon clincher wheels very strong and durable when you are go cycling. The weight is very light and the performance is very good.


3 Is it a truth that wider rims are better?
 
The width of the rims is usually 19mm for most carbon road bike wheels. But recently the improvements on the wheels have shown that wider wheels are better.
 
Why is wider rim better? There are 3 reasons including aerodynamics, handling, and rolling resistance.
 
1. A wider rim is more aerodynamic. The wider the rims is , the better will it match the width of the tire. This creates a balance of pressure from the front wheel to the back wheel, which results in a smoother flow of air on the wheels and bike.  That is to say, you can ride a bike faster and more efficiently.
 
2. Wide rims make you have a better handling.  In the case of clincher wheels, a wider rim spreads out the sides of the tire in round shape, which improves the handling by strengthening the consistency of the tire shape throughout different types of turns, especially some hard turns.  In case of tubular wheels, the shape of the tires is always round, which is decided by the production of tubular tires.  A wider rim increases the connection between the rim and the tubular tire while reducing the possibilities of tire rolling sideways off the rim.  And this makes the wheel safer and you can steer the bike better when you are making a hard turn.
 
3. Wide rims can reduce the rolling resistance.  In the case of clincher wheels, the wider rim allows the tire to spread out wider, which changes the shape of tire’s contact patch and some parts that contact the road.  If you use a narrow rim, the contact patch will be in a rectangle shape.  If you use a wider rim, the contact patch will be wider.  And it will be in a square shape, which will reduce the rolling resistance of the tire and improve the speed and efficiency.
 
Are wheels with wider rims heavier and will make the speed slower?  A wheel with wide rim will be heavier because it is made up of more carbon fiber.  Generally, most people think that the cycling speed will be slower if you use a heavier wheel. In fact, it is not true because the advantages of aerodynamics, handling, and rolling resistance outweigh the added weight.  If you want to compare the specifications of different wheels, that is the key point.  If you use a wide rim wheel instead of a narrow one, you can ride faster even though the weight reaches to hundreds of grams.
 
How to define the width? The standard width for a road bike rim is 19mm.  If the width is more than 23mm, it can be defined as “wide”.  Carbonfan defines the width as 25mm, which means the width of brake surface is 25mm in order to form compatibility with brakes and frames.
 
So if you ask me whether wide rims are better, I will answer you “YES” with certainty.
 
4. What does 38 , 50, 60, 88 mean?
 
You have learned how to choose the wheels between clincher and tubular ones in last lesson. Now i will tell you the meaning of these strange numbers:38,50,60,80.
 
These numbers represents the depth of the wheel's aerodynamic rim. Their unit is millimeter. I will take 38mm for example. This means the rims extends an extra 38mm towards the center from where the tire meets the wheel. 88mm means the rim extends 88mm from the tire.
 
Why is it very important? One of the biggest advantages of carbon raod bike wheels is the aerodynamics. They will decide how fast and efficiently a cyclist can ride. When  you are going cycling with your friends, and  leave behind others, it will be easier for you to keep up with them because of the great aerodynamics.
 
The biggest source of slow aerodynamic turbulence is the rolling wheels. We really value that problem so we built the wheels which have the advantage of aerodynamics. We also increase the depth of the rim.  The deeper the rim is, the more aerodynamic the wheel will be, and you will go riding faster and efficiently when you go through the wind as well.  Rim with the depth of 88mm is more aerodynamic than that of 38mm, which will make your speed faster when you are in the situation of important aerodynamics like triathlon.
 
Since rims with 88mm depth are more aerodynamic, why will people choose rims with 38mm?  If a wheel becomes aerodynamic, it can be easily affected by cross wind or lateral wind.  Let’s image that when you use the front and rear rim with 88mm depth, your riding speed will be very fast because of the aerodynamics of deep wheels.  But if the wind comes from the side direction, it will blow the large rims and the whole bike to other directions.  It will not matter a lot if you ride a bike alone like triathlon, but if you ride a bike with many other cyclists, you will hit others unless you pay closely attention to your riding.
 
Is there any solution to this situation? There will have less effect but less aerodynamic advantage if you choose the rim with shallower depth.  if that doesn’t work out ,you may consider factor of weight.  Wheels with 38mm depth will lighter than that with 88mm depth because less carbon is applied to them.  If you ride a bike with a lighter wheel, your riding speed will be improved.  At the same time, it will make you easier to ride up the hills. So if you like climbing hills and sprint, rims with 38mm depth will be your best choice.
 
Why do you often see a bike with different front and rear wheels?  Because the front wheel is used to steer the bike, which is easily be affected by the cross wind.  Rear wheel will not be affected largely because it is fixed in a straight line with the bike.  You can choose a rear wheel with deeper rim for not affecting the handling. carbonfan offers wheelsets with 38mm-50mm to solve this problem.  This kind of wheelset is made up of a front rim with 38mm depth and a rear rim with 50mm depth.  Now you can take advantage of aerodynamics to keep your bike stable enough even in windy conditions.
 
Do you know how to choose wheels? I think it is one of the hardest things for cyclists to choose a suitable wheels.  Firstly, you should think about the situations when you are riding.  You can choose a wheelset with 38mm depth if you often go cycling along the mountain.  You can choose a wheelset with 50mm depth if you are an all-around cyclist.  If you are an all round cyclist who seek for more aerodynamic advantage, you can choose a wheelset with 60mm depth. If you like go cycling alone or take part in the triathlon, you can choose a wheelset with 88mm depth.
 
It is still difficult for you to decide on which one to buy?  You can just choose a wheelset with 60mm depth because it is the most popular and great one which owns all around wheelset.  But if you join in a triathlon, just choose the one with 60-88mm depth for its popularity among the triathlon athletes.
 
5. Are Spokes and Hubs important? The answer is yes.
 
What’s the difference among different spokes? Carbonfan provides all kinds of spokes.  The standard spokes are pillar ones.  We also upgrade to the spoke Sapim CX-Ray, which are the best ones in the world. They are much more stronger, lighter and aerodynamic.
 
Which kind of riders need to upgrade the spokes to Sapim CX-Ray?
If you are a strong and fat rider, the increased strength of the Sapim spokes will keep your wheel longer.  At the same time , if you want your wheels to perform best, the increased aerodynamics and lightweight will give you a wheelset with excellent performance.
 
In fact, the standard pillar spokes are also very good.  We are glad to recommend them to people who want a great wheelset which will cost them a fortune.  If you can’t decide which one to buy, just choose the standard spokes because it is much cheaper. If you have a good understanding of the good performance of Sapim CX-Rays, don’t hesitate to upgrade it.
 
How do choose good hubs? Carbonfan mainly offers 3 different road bike hub sets. Our standard hubs are DT Swiss 350. We also provide DT Swiss 240s , which are upgraded based on DT Swiss 350 .  And we also have especially upgraded Hope Rs4 hub sets.
 
The standard DT Swiss 350 hub is pretty good, and it is also our most popular hub.  We will recommend it to riders who want a great hub set at a reasonable price.
 
The DT Swiss 240s hub is lightweight. It is more durable and will roll faster.  You don’t need to check and repair all the time.
 
The DT Swiss 240s and Hope RS4 hub set is marvelous, but to be honest, you will have to pay much more money for it due to the factor of brand effect.  If you want to get your friend's approval, just choose DT Swiss 240s or Hope RS4 hub set.
 
If it is hard for you do decide which one to purchase, I will recommend the standard spoke, the standard DT Swiss 350 , They are all very great and I'm sure you'll love them.
CARBONFAN is now proud to present a new type of rim appearance to the riders. first time in the world!

CARBONFAN is now proud to present a new type of rim appearance to the riders. first time in the world!

We all know that the present market of carbon fiber bicycles include the appearance of the rim as followed, weave UD, 3K, 12K, 24K, and matte and glossy as finishing surface. In order to prevent visual fatigue, our Ben–series of wheels launch a new look for the rim market. Attached a picture.

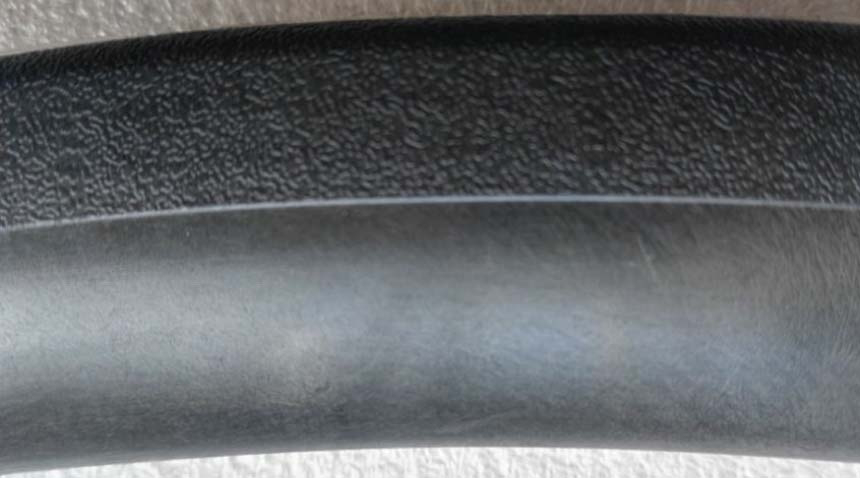
As you see, first of all, the brake side on this pic is made from a type of new slip-preventing material chemical. The look of cow-skin, we just call the Cow-stripe braking track temporarily. Compared to the traditional basalt brake side, the touch-braking effect shows up very prominent when riding, which results a obviously higher sensitivity for braking. Thus, the traditional brake side needs a rather long braking times (especially during the downhill process). This avoids the obvious and instantaneous temperature increase of the brake side of the large, greatly reducing the chance of deformation of the brake track. Of course, the special look of the stripe on brakes edge is also much nicer than ordinary basalt brakes, last but not least, CARBONFAN Team think so.

Secondly, the rest of the rim surface (part of the brake track side), we launched the Silk-looking weave in matte finishing. Seeing the picture, unlike the traditional UD matte design without any line nor block on, this new idea of appearance we used in the production process, permits the rims looking and feeling like a real silk, natural, delicate, presenting. The use of breathable weave, helps a lot to achieve such a nice sensory effect, objectively .
Now, as first stage, only three specifications with this SILK appearance of the rim were just introduced to the riders by CARBONFAN, as followed :
1. 30mm depth – Clincher – 23mm width, 410 +/- 10g, SILK-UD-Matte,
2. 38mm depth – Clincher – 23mm width, 440 +/- 10g, SILK-UD-Matte,
3. 50mm depth – Clincher – 23mm width, 480 +/- 10g, SILK-UD-Matte.

Buy wheels from here:

2017 new release 700C width 23mm Clincher carbon road rims BQ series

Only Buy rims form here :

2017 new release 700C width 23mm Clincher carbon road rims BQ series

CARBONFAN suggests it!